Overview
Our task this project was to create a string instrument, a wind instrument, and a chime or percussion instrument. But before we learned about how to make the instruments, we had to learn about sound waves. Along with that, we learned about transverse and longitudinal waves. We studied amplitude, wavelength, and how to produce those waves. Our primary focus was to learn how we can produce sound waves with different styles of instruments.
Our three instruments
Our three instruments were the chimes, flute, and guitar. Each instrument shows a different way notes are made.
The Chimes:
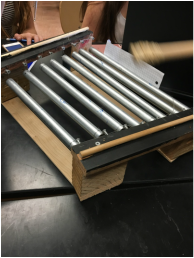
Our chimes work by vibrating at their natural frequencies; the longer chimes produce lower pitches, and the shorter chimes create a higher pitch. This is because the longer chimes vibrate slower, so they have a lower frequency and put out a lower pitch with the shorter chimes, it is the opposite. The shorter chimes vibrate faster, producing a higher frequency, and therefore a higher pitch. For our chime instrument, we decided to go with a unique design that suspends the chimes in the air using fishing wire. To start, we calculated the length we would need for each chime to produce a C scale. After we created the measurements, we cut the pipes. Next, we got two pieces of wood that would serve as the base of the instrument. Then we got 4 wood blocks and attached 1 to each corner. This provided our design with more stability, and gave us the idea to suspend the chimes in the air, rather than attached to the wooden base. Unlike other designs, the chimes are attached on both sides horizontally, instead of attached one 1 end, and dangling down vertically. Next, we drilled screws into the wooden base and strung fishing wire through our chimes and tied it to the screws on either end. This suspended the chimes in the air which provides a clear, unmuted sound. We also added a base support at the bottom of our instrument to insure stability and prevent the two sides from falling down. Our pipes were about 1mm thick, which affects the natural frequency of the object. The pipes we used create a louder and clearer sounds. The frequency of the vibrations is what creates the different notes on the chimes.
The Chimes:
Our chimes work by vibrating at their natural frequencies; the longer chimes produce lower pitches, and the shorter chimes create a higher pitch. This is because the longer chimes vibrate slower, so they have a lower frequency and put out a lower pitch with the shorter chimes, it is the opposite. The shorter chimes vibrate faster, producing a higher frequency, and therefore a higher pitch. For our chime instrument, we decided to go with a unique design that suspends the chimes in the air using fishing wire. To start, we calculated the length we would need for each chime to produce a C scale. After we created the measurements, we cut the pipes. Next, we got two pieces of wood that would serve as the base of the instrument. Then we got 4 wood blocks and attached 1 to each corner. This provided our design with more stability, and gave us the idea to suspend the chimes in the air, rather than attached to the wooden base. Unlike other designs, the chimes are attached on both sides horizontally, instead of attached one 1 end, and dangling down vertically. Next, we drilled screws into the wooden base and strung fishing wire through our chimes and tied it to the screws on either end. This suspended the chimes in the air which provides a clear, unmuted sound. We also added a base support at the bottom of our instrument to insure stability and prevent the two sides from falling down. Our pipes were about 1mm thick, which affects the natural frequency of the object. The pipes we used create a louder and clearer sounds. The frequency of the vibrations is what creates the different notes on the chimes.
|
Here is a table for each of the notes and it's corresponding lengths:
C- 14 in D- 13.99 in E- 12.52 in F- 12.12 in G- 11.43 in A- 10.84 in B- 10.22 in C- 9.89 in |
|
Flute:
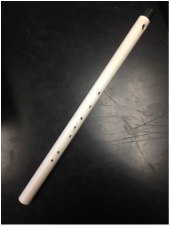
A flute’s sound is based on the principle of vibrations. The flute works by forcing air to escape out of holes in the flute which are all set at different lengths. We control the output by plugging specific holes with our fingers. The holes that are closer in distance to the mouthpiece, make higher the sound of the pitch. By covering holes you force the air to travel a longer distance down the flute and too the end. For our design, we decided to go with a very simple design. The body of the instrument is made of PVC piping with half centimeter wide holes drilled in it. We also used a rubber stopper to push all the air out of 1 side. The vibrations occur when a person blows air over the mouthpiece which causes the air in the tube to vibrate.The pitches are higher when the holes are open closer to the mouthpiece because there is the zone of neutral pressure is closer to the mouthpiece caused by the influx of neutral pressure air brought in by the open holes, shortening the wavelength.
A flute’s sound is based on the principle of vibrations. The flute works by forcing air to escape out of holes in the flute which are all set at different lengths. We control the output by plugging specific holes with our fingers. The holes that are closer in distance to the mouthpiece, make higher the sound of the pitch. By covering holes you force the air to travel a longer distance down the flute and too the end. For our design, we decided to go with a very simple design. The body of the instrument is made of PVC piping with half centimeter wide holes drilled in it. We also used a rubber stopper to push all the air out of 1 side. The vibrations occur when a person blows air over the mouthpiece which causes the air in the tube to vibrate.The pitches are higher when the holes are open closer to the mouthpiece because there is the zone of neutral pressure is closer to the mouthpiece caused by the influx of neutral pressure air brought in by the open holes, shortening the wavelength.
|
A table of the notes and distance from mouthpiece:
A5- 5.1 in G5- 6.2 in F5- 7.4 in E5- 8.1 in C6- 8.8 in B5- 10.1 in |
|
The guitar:
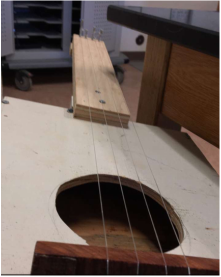
Our guitar works by vibrating at half a wavelength of the natural frequency. Our building of this guitar was difficult. We decided that we wanted our instrument to play at the C4 scale. This means that it would have to be 66cm in length for the string. This is because the full wavelength for a C4 is about 132 cm. Since we want the guitar to play at half the wavelength, we made the length 66cm. The reason it vibrates at half of the wavelength is because of the wave going back and forth across the string creates one whole wavelength. This creates a natural frequency for each note. Another reason why our guitar works is because we use different tensions to create different notes. The next step of our guitar was to find the right note for each string. Although you can make each string a different length and you get a different note, you still have to tighten it to create the note. But for our guitar, we kept each string the same length and adjusted the string from there. A higher tension creates a higher note.For example, an A note is higher than a C note of the same octave. This is because the A note has a greater tension. The tension affects the note because it makes it so the string can’t vibrate as easily, which makes the string go faster. When it vibrates faster, it creates a higher note. To make our guitar louder we added a sound box. The sound box is a box on end of the guitar with a hole in the middle area. It is directly underneath the strings. When the strings produce sound, the sound box amplifies it. The reason it amplifies it is because the vibrations go into the sound box’s hole, then the vibrations reflect off the walls, and each wave will reflect on each other trying to get out of the sound box. This helps make the strings seem louder and give the guitar a powerful sound.
Our guitar works by vibrating at half a wavelength of the natural frequency. Our building of this guitar was difficult. We decided that we wanted our instrument to play at the C4 scale. This means that it would have to be 66cm in length for the string. This is because the full wavelength for a C4 is about 132 cm. Since we want the guitar to play at half the wavelength, we made the length 66cm. The reason it vibrates at half of the wavelength is because of the wave going back and forth across the string creates one whole wavelength. This creates a natural frequency for each note. Another reason why our guitar works is because we use different tensions to create different notes. The next step of our guitar was to find the right note for each string. Although you can make each string a different length and you get a different note, you still have to tighten it to create the note. But for our guitar, we kept each string the same length and adjusted the string from there. A higher tension creates a higher note.For example, an A note is higher than a C note of the same octave. This is because the A note has a greater tension. The tension affects the note because it makes it so the string can’t vibrate as easily, which makes the string go faster. When it vibrates faster, it creates a higher note. To make our guitar louder we added a sound box. The sound box is a box on end of the guitar with a hole in the middle area. It is directly underneath the strings. When the strings produce sound, the sound box amplifies it. The reason it amplifies it is because the vibrations go into the sound box’s hole, then the vibrations reflect off the walls, and each wave will reflect on each other trying to get out of the sound box. This helps make the strings seem louder and give the guitar a powerful sound.
|
A table for all the notes and each of it's lengths:
C4- 131.87 cm D4-117.48 cm E4-104.66 cm F4-98.79 cm G4-88.01 cm A4- 78.41 cm B4-69.85 cm |
|
Concepts
Transverse wave: A wave that moves perpendicular to it's direction as it travels. Light, and the electromagnetic spectrum are examples of transverse waves.
Longitudinal wave: A wave that compresses and expands as it moves forward, or parallel to it's direction of travel. Sound is a very important longitudinal wave we learned about in this unit.
Amplitude: Displacement from equilibrium to the crest of a wave. Amplitude measure sound waves and it's volume.
Wavelength: The distance from crest to crest, trough to trough, or equilibrium to equilibrium in a wave. Wavelength is measured in meters using the equation, wavelength= velocity/frequency. One example of how we use wavelength is in the string of the guitar. Each different note has a different wavelength.
Frequency: The number of waves or vibrations in a unit of time. We use the equation frequency= 1/period, or frequency= volume/wavelength.
Period: The time between waves/vibrations for one wavelength to pass. We use the equation period= 1/frequency
Reflection
This project was a lot of fun! I loved working with my group, and creating an instrument was a lot more enjoyable than I thought it was going to be. I came into this project not knowing anything about musical instruments. I didn't know why each note was different, or how a guitar even works. Now I do know how a guitar works and actually made one. One thing I feel as if I struggled with was not knowing what I would do next. I would complete something, then be completely lost on what I should do next. It made the building process a lot slower than it really should've been. Another thing I struggles with was compromising. I had a lot of moments where I only wanted to do things my way. This made everyone unsure of what we should do. One thing I think I did well on was adapting quickly to problems that came up. An example of this was presented in creating the guitar. Our guitar strings kept breaking when we tried to put it at a certain octave. We discovered that the tension was too high in the strings, and caused them to snap, so we changed the octave. One more peak I had was helping out with new ideas. On the chimes, one of my suggestions was to put the chimes at a horizontal face and hang (as seen in the picture of the chimes) . This created less friction compared to having the chimes sit atop of the wood blocks. This project was really fun because I had a great group, and it was fun learning how to build an instrument!
